
| 일 | 월 | 화 | 수 | 목 | 금 | 토 |
|---|---|---|---|---|---|---|
| 1 | 2 | 3 | 4 | 5 | ||
| 6 | 7 | 8 | 9 | 10 | 11 | 12 |
| 13 | 14 | 15 | 16 | 17 | 18 | 19 |
| 20 | 21 | 22 | 23 | 24 | 25 | 26 |
| 27 | 28 | 29 | 30 |
- github token
- python basic
- 모니터연결
- 깃허브 토큰
- git command
- github 블로그
- github
- CUDA
- github blog
- git 명령어
- 깃헙 토큰
- sudo pmset -c disablesleep
- jekyll
- 깃헙
- 깃헙 블로그
- github.io
- github command
- nightly
- github secret key
- 깃허브 블로그
- 깃허브
- 잠자기해제
- 구글애널리틱스
- terminal 명령어
- terminal command
- 나만의블로그
- hydejack
- GPU
- jekyll theme
- pandas
- Today
- Total
목록
반응형
깃허브 블로그
반응형
(2)
Tech-Logs of Data-Scientist
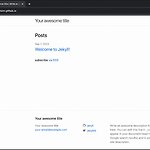 [github.io 블로그만들기 2편] Jekyll로 Github.io 블로그를 꾸며보자!
지난글 Github.io 블로그를 만들어보자! (github.io 블로그만들기 1편) 오늘의 포스팅은 Github을 통해서 Blog를 만드는 방법입니다. 다른 블로그를 참조하면서 만드는 과정을 정리하였습니다. 1. Github에 새로운 Repository를 만들기본인의 Github으로 이동하여, Repositories → data-scientist-techlog.tistory.com 지난글에서는 github.io 블로그를 만들어봤었는데, 이번글에서는 Jekyll로 github 블로그를 꾸며보겠습니다! 1. Jekyll install 먼저, jekyll의 설치가 필요합니다. 아래의 코드를 terminal에 입력해서 실행시켜주세요! sudo gem install bundler sudo gem install ..
 [github.io 블로그만들기 1편] Github.io 블로그를 만들어보자!
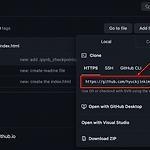
오늘의 포스팅은 Github을 통해서 Blog를 만드는 방법입니다. 다른 블로그를 참조하면서 만드는 과정을 정리하였습니다. 1. Github에 새로운 Repository를 만들기 본인의 Github으로 이동하여, Repositories → New를 순서대로 클릭하여 새로운 repository를 만들어줍니다. 이후에 "username.github.io"의 형식으로 repository 이름을 설정 한 후, Create repository를 눌러 repository를 생성합니다. 🔥 주의사항 1. username.github.io 의 형식으로 만들어야합니다. 2. username 부분은 Github username과 동일하게해야합니다. - Github username이 "hyuckjinkim"이고 reposi..